We passed the building inspection yesterday, and notwithstanding some electrical placement tweaks, the guys are stuffing insulation and hanging sheetrock this week.
Unfortunately, we need to sink some money into plumbing fixes the inspector noted after all. But it feels good to be past the inspections (except for final). We're now at the beginning of the end of the project. :-)
Tuesday, November 25, 2008
Thursday, November 20, 2008
Inspections
Quick update: Inspections are really moving fast (I bet that's not a sentence uttered too often!). Today we had, and passed, our electrical inspection, and our building inspection is scheduled for Monday morning! If that goes smoothly next week we'll be getting actual walls...
Wednesday, November 19, 2008
Week 5
Not a lot of dramatic stuff this week. But things are moving along. The rough-in plumbing inspection happened with no major snags and we passed. As of today, the sidewalk is patched up, too. :-)

Mostly this week the house has been empty except for the electrician, who has been wiring up all the outlets and switch boxes. The electrical inspection is tomorrow, which we're also expecting to go smoothly.

Finally, we anticipate having the building inspection (and "ok to cover") early next week. After that, the wallboard goes up, cabinets come back in, countertops, floors, tile, fixtures...it'll really start coming together!
Saturday, November 15, 2008
"Kitchen Sink"

Both faucets ran milky white for some time. I let the yard spigot run for a few minutes and emptied probably 20 gallons or so from the kitchen via bucket brigade (can I still call it a brigade if it's just me?). Anyway, all the water's running clear now, though it still smells funny...Good enough for brushing teeth, I guess.
UPDATE 11/19: I ran a hose out the kitchen window and blasted the water for about 15 minutes yesterday. It's fine now.
Water

Well, our water is flowing again through our new upgraded supply line.

Here's the new larger supply line coming into the garage. Old line is on the left. It was only 1/2".

I think we got a new meter, too, but can't really tell. Hard to get out of the front of the house via the stairs this weekend; I presume they're going to re-concrete on Monday, since it appears the plumbing part is done.
Deck is finished!
Here it is! There is still protective sheeting down for coming and going for now, but it's all done. :-)
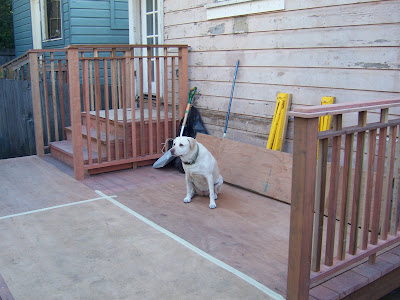
Francisco and Ephrain executed the design very well, and I think it came out great. It's a little busier than I'd designed, because the number of 2x2 balusters had to be increased to pass the kid's-head-through-the-bars test.

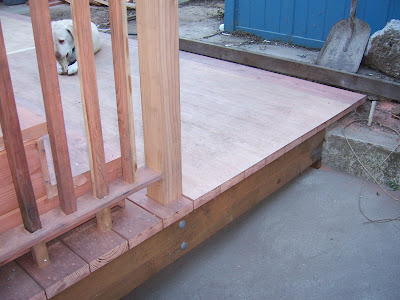
The new deck is at grade (mostly).
And here's that extra work for the drainage. There's flashing and a keyed-in concrete cap. Before, it was basically the opposite (a funnel towards the wood).
This area will be our "puppy patch;" I'm going to fill it with gravel, sand and sod for a nice green potty for Emma (the rest of our yard will thank me for it). Also, that fill will reduce impervious area and increase the water detention capacity. We're not putting in a drain (talked about it, but too expensive), but I anticipate this will be more than fine. It's not like we had a flooding problem before, and this will make things substantially better.

Francisco and Ephrain executed the design very well, and I think it came out great. It's a little busier than I'd designed, because the number of 2x2 balusters had to be increased to pass the kid's-head-through-the-bars test.


The new deck is at grade (mostly).

And here's that extra work for the drainage. There's flashing and a keyed-in concrete cap. Before, it was basically the opposite (a funnel towards the wood).
This area will be our "puppy patch;" I'm going to fill it with gravel, sand and sod for a nice green potty for Emma (the rest of our yard will thank me for it). Also, that fill will reduce impervious area and increase the water detention capacity. We're not putting in a drain (talked about it, but too expensive), but I anticipate this will be more than fine. It's not like we had a flooding problem before, and this will make things substantially better.
Tuesday, November 11, 2008


The Tub Saga
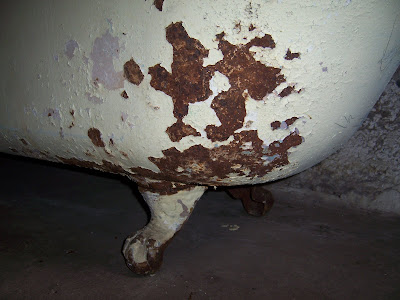
So, a few months back we're in Berkeley and stop by Ohmega Salvage. We weren't looking for a bathtub that day but knew we wanted a clawfoot eventually. We happened to find a cast-iron tub in a rare size, a deep and narrow soaking 25 incher. Ohmega wanted $250. Sold.
It needed refinishing, but was a great find. Aside from the paint and rust, it had several substantial porcelain chips and cracks, which were worrisome.
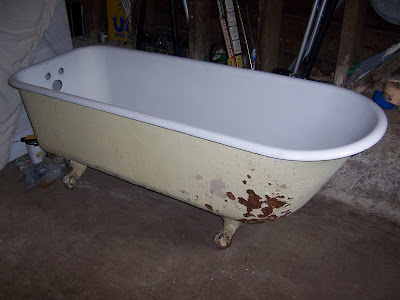
After paying another $160 for delivery, it sat in our garage for a few months. When it was delivered, we learned that the manufacturer date stamped the underside of each tub. We bonded with it even more.
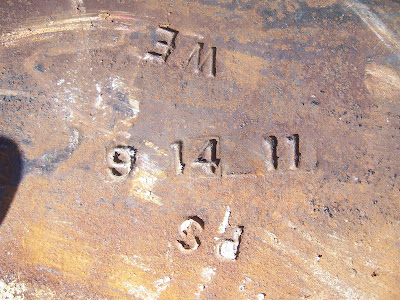
Made on our wedding anniversary, just our size, and about to see its 100th birthday with us.
It's a keeper.
It looked like sandblasting and powdercoating was a good way to go for rejuvinating this baby, so I contacted a few different folks for quotes. We really didn't want a plasticy coating, and powder coating is much environmentally superior to traditional resurfacing (no VOCs in solvents or paint). The idea was to blast and coat the exterior; the interior was porcelain which I learned is nearly impossible to get off and even if you could, nobody resurfaces with actual porcelain anymore. And for the exterior, comments varied from, "sure no problem," to "it can't be done" with cast iron. I eventually went with West Coast Powdercoating in south city. Great people to work with. I very highly recommend them (unless you're coating a cast iron tub...)
I have to give tons of credit to A.J. at West Coast. He gave it well more than the ol' college try, and warned up front that they couldn't really predict how it was going to come out. I decided to risk it. Sure enough, the porcelain basically shattered in several places in the oven. Plus, the powder coating didn't come out as nicely as we wanted, as the iron released gasses when baking, making tiny bubbles and an irregular surface. We were well warned, but nevertheless disappointed (except for the feet, also cast iron, which for some reason came out great).

I don't have a picture of the damage, but just as well.
So we went to the traditional resurfacer, Miracle Method, which said they patch damage such as ours regularly. However, our "chips" were now more like missing chunks several inches long in places, so I was skeptical. But I can highly recommend MM East Bay -- they did an amazing job with what we gave them.
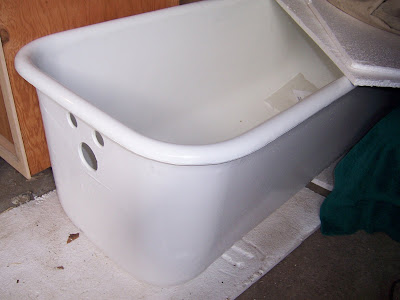
$410 for the tub, delivered; $350 for the powder coating (and more delivery); $525 for interior resurfacing. That's $1,285, and we haven't added any faucets yet....
We're never getting rid of this tub.
It needed refinishing, but was a great find. Aside from the paint and rust, it had several substantial porcelain chips and cracks, which were worrisome.


After paying another $160 for delivery, it sat in our garage for a few months. When it was delivered, we learned that the manufacturer date stamped the underside of each tub. We bonded with it even more.

Made on our wedding anniversary, just our size, and about to see its 100th birthday with us.
It's a keeper.
It looked like sandblasting and powdercoating was a good way to go for rejuvinating this baby, so I contacted a few different folks for quotes. We really didn't want a plasticy coating, and powder coating is much environmentally superior to traditional resurfacing (no VOCs in solvents or paint). The idea was to blast and coat the exterior; the interior was porcelain which I learned is nearly impossible to get off and even if you could, nobody resurfaces with actual porcelain anymore. And for the exterior, comments varied from, "sure no problem," to "it can't be done" with cast iron. I eventually went with West Coast Powdercoating in south city. Great people to work with. I very highly recommend them (unless you're coating a cast iron tub...)
I have to give tons of credit to A.J. at West Coast. He gave it well more than the ol' college try, and warned up front that they couldn't really predict how it was going to come out. I decided to risk it. Sure enough, the porcelain basically shattered in several places in the oven. Plus, the powder coating didn't come out as nicely as we wanted, as the iron released gasses when baking, making tiny bubbles and an irregular surface. We were well warned, but nevertheless disappointed (except for the feet, also cast iron, which for some reason came out great).

I don't have a picture of the damage, but just as well.
So we went to the traditional resurfacer, Miracle Method, which said they patch damage such as ours regularly. However, our "chips" were now more like missing chunks several inches long in places, so I was skeptical. But I can highly recommend MM East Bay -- they did an amazing job with what we gave them.

$410 for the tub, delivered; $350 for the powder coating (and more delivery); $525 for interior resurfacing. That's $1,285, and we haven't added any faucets yet....
We're never getting rid of this tub.
Toys in the attic!

I was so stoked to discover the attic space. Before, there was only a tiny access door inside our packed tiny closet, so we never got to look around up there. There's a ton of space -- not a high enough ceiling for living space, but LOTS of storage space. I was surprised to find there's virtually no insulation. We want to put in a larger access hatch and telescoping ladder just inside the front door.
Yesterday, they put down 3/4" ply up there and now it's easy to walk around. Check out the Solatube (and if you look closely, Diego...)!
Closets

Above is an image from inside the bathroom. The short section of sloped ceiling represents our former bedroom closet width, and you can also tell the depth. Now pretty much everything in this frame is going to be the footprint of a steam shower.

Each bedroom is now getting its own, grown-up-sized closet. The master gets a 7x2 at the kitchen's expense (sorry, not a great photo, taken from kitchen side)...
...and the front bedroom gets a 1'8" x 7' built into the room itself:

Kitchen progress
Remember the kitchen I (partially) demolished? Here's more in that series:
Going...
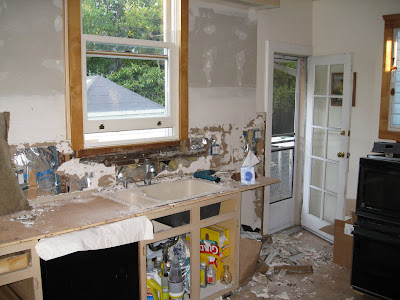
Going....

GONE!
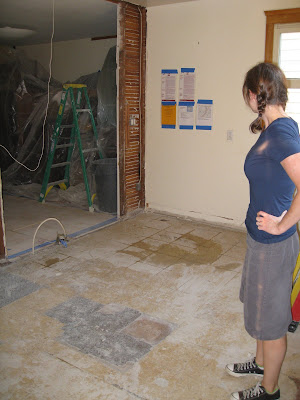

Now it's even more demolished!
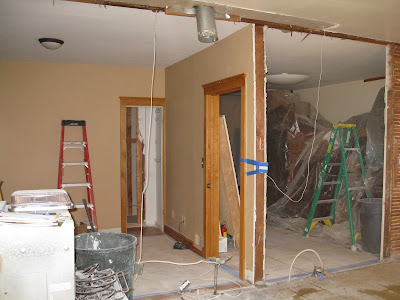
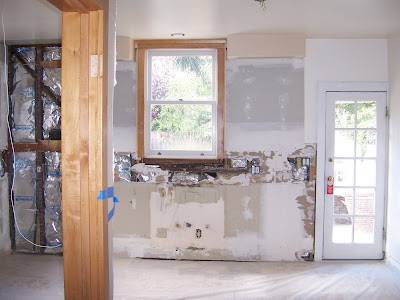
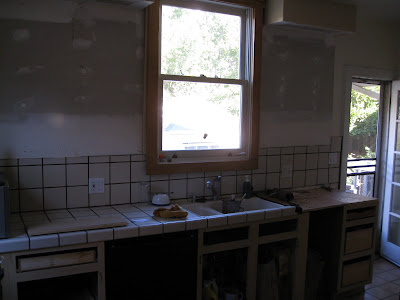
That post there is actually the door jamb of our bedroom. So you can see the entire wall separating our bedroom from the kitchen has been removed. The wall facing the back yard, pictured above, will look something like this when completed:
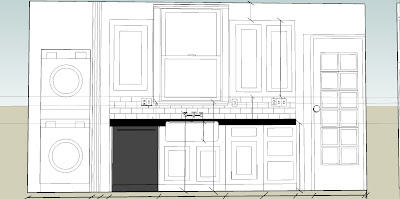
Pretty much the same layout, except a dividing wall has been erected on the left hand side for a new pantry with stackable laundry. It'll be so nice not to have to go out on the deck to get the wash! We'll reinstall the cabinets, and reface them (new doors), get white subway tile on the wall, and an apron-front sink. The countertops will be black Caesarstone, a quartz product. The floors will be done in oak hardwood to match the rest of the house. Speaking of floors...
Asbestos!!!
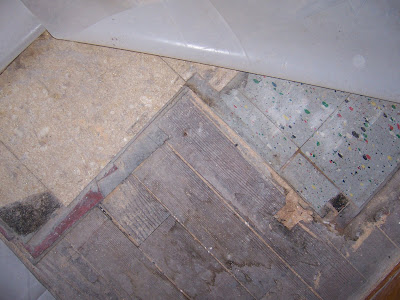
Under that 80s tile was 70s linoleum (beige, left). Under that, was 60s linoleum (gray & colorful flecked, right), and under that was 50s linoleum (red, left). All three came back positive for asbestos. Although that's $1,500 we hadn't planned on spending, the professional testing and removal process was actually very efficient and it was all done in 1 day.

Going...

Going....

GONE!

Now it's even more demolished!


That post there is actually the door jamb of our bedroom. So you can see the entire wall separating our bedroom from the kitchen has been removed. The wall facing the back yard, pictured above, will look something like this when completed:

Pretty much the same layout, except a dividing wall has been erected on the left hand side for a new pantry with stackable laundry. It'll be so nice not to have to go out on the deck to get the wash! We'll reinstall the cabinets, and reface them (new doors), get white subway tile on the wall, and an apron-front sink. The countertops will be black Caesarstone, a quartz product. The floors will be done in oak hardwood to match the rest of the house. Speaking of floors...
Asbestos!!!

Under that 80s tile was 70s linoleum (beige, left). Under that, was 60s linoleum (gray & colorful flecked, right), and under that was 50s linoleum (red, left). All three came back positive for asbestos. Although that's $1,500 we hadn't planned on spending, the professional testing and removal process was actually very efficient and it was all done in 1 day.
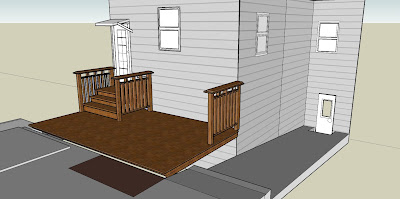
Progress on backyard deck
In the back, we pulled off the vinyl siding (yuck!) and removed the laundry shed. The machines will move inside to a new pantry. The deck itself is being torn out and rebuilt at grade, with a lot less railing...

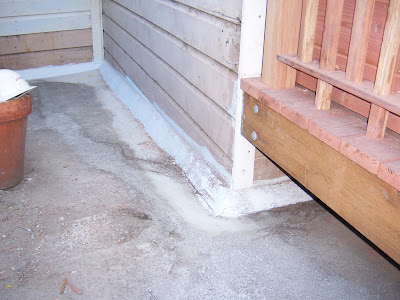
Below is where it stands today. Some siding repair was necessary and we had to do unexpected drainage work in the concrete at the interface with the house. :-(

Here's my design to give you an idea of how it's going to look. Google Sketchup is cool. :-)

Below is where it stands today. Some siding repair was necessary and we had to do unexpected drainage work in the concrete at the interface with the house. :-(

Here's my design to give you an idea of how it's going to look. Google Sketchup is cool. :-)

Bathroom(s)
 We're dividing our ~6x10 bathroom into two. Originally, the plan was to have access to each off of each of the two bedrooms, but we decided to have the new, smaller bathroom maintain "public" access off the dining room. We reused the same door, but had to move it 18" or so toward the living room because the existing door would otherwise have opened into the space where the shower will go. You can see the zig-zag dividing wall above, and how the door moved to where there used to be a wall dividing dining and living rooms below.
This smaller, public bathroom will have a couple of cool green features. It will be lit with a Solatube, a type of skylight that reflects sunlight down a shaft and then spreads it out, looking pretty much like a largeish can light in the ceiling. This one will integrate a compact flourescent in the shaft, so when it's totally dark it'll also work on a switch. You can see the unit below (without the tube yet) up through the attic. It's quite bright!
 There will be no sink in the small bathroom at first. Believe it or not, SF code does not require a sink in a bathroom. But what I'm going to put in there eventually is a toilet tank lid-integrated sink, that daylights the clean water used to fill the holding tank, allowing you to wash your hands when you flush. The soapy gray water from your hand washing then goes into the tank, ready for the next flush. All toilets get filled with clean, potable water -- how dumb is that?! This way you get to use it first.
The "master" bath will be off our 9x12 bedroom. Here's where the new access door (actually reused from the front bedroom closet) went in (plus you can see where we're getting a nice big skylight):

The master has a clawfoot tub (I'll do a separate post on that), toilet, and two small basins crammed into a 36" wide "vanity." For the vanity I'm reusing our old wooden IKEA kitchen island, given to us as a gift from my folks (thanks!). I modified it's width by removing the butcher block top and removing a section from the middle. The big thing now is to make a mold for the concrete counter top and try my hand at pouring it...wish me luck!
Friday, November 7, 2008


Accommodations
Ok, long time no post. Various camera charging and photo transferring problems...plus living in a plastic bubble. I know, excuses! First, here's the bubble:

We put up canvas curtains ourselves but then the contractor also put in plastic sheeting with the snazzy zipper in it. One leads to the front door and the one in the photo above leads to the "dining room." As you can see, we've at least got a cold supply of cheese nearby (and microwave).
Here's the actual abode inside the bubble:
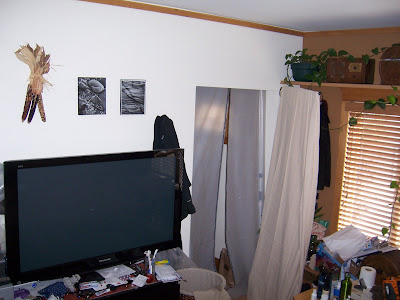
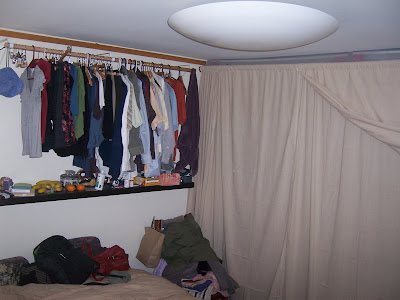
It's been snug, but we're managing...
Subscribe to:
Posts (Atom)
