We've got a few bids from painters recently for the exterior of the house. The variability was pretty shocking.
But I also remembered recently seeing a product display for RhinoShield at West Coast Green, and wanted to check them out in more detail. The basic idea is it's a paint-like coating that can be tinted (and looks) like any color paint, but it's actually a ceramics-based sealing material. They came by on Monday and gave us their spiel.
RhinoShield costs more than painting, but actually not much more than the higher end painting estimates we got. It's supposed to last forever and has a lifelong transferable warranty (so that'd be the life of the house, not you).
I like the idea, both from a cost / hassle standpoint and an environmental one, of not having to repaint every 5-10 years. It's also a greener way to go in terms of energy efficiency (effectively adding extra insulation to your home), encapsulation of existing lead paint (though I'm not that worried we have any), and no VOCs.
We're going to sign a contract with them tomorrow.
Thursday, January 29, 2009
Final inspections
We had our final plumbing inspection yesterday. Today I learned via email that we did not pass.
Our GC's mesage did not say why, but suggested it's a minor issue and the final will just need to be rescheduled.
Drama.
Our GC's mesage did not say why, but suggested it's a minor issue and the final will just need to be rescheduled.
Drama.
Monday, January 26, 2009

Monday, January 19, 2009
Kitchen coming together
All the big things are moved in. We could even cook something if we could find a pan...
Still lots of cabinet carpentry, priming, and painting, and that's what we've been working on mostly the last few days.

Hopefully we can get final inspections done this week. Maybe then the whole project will span my birthday to Thea's. :-)

Still lots of cabinet carpentry, priming, and painting, and that's what we've been working on mostly the last few days.

Hopefully we can get final inspections done this week. Maybe then the whole project will span my birthday to Thea's. :-)


FINALLY.

Far from ideal, but a shower's a shower. The correct curtain ring should arrive Thursday or Friday.
Thursday, January 15, 2009
Nope.
No. Still no shower.
I should know better by now.
Now it's the curtain ring being the wrong diameter pipe to fit the shower head riser.
UUUrrgggghhhh!
I should know better by now.
Now it's the curtain ring being the wrong diameter pipe to fit the shower head riser.
UUUrrgggghhhh!
Tuesday, January 13, 2009

Tub Feet
We should have a shower installed tomorrow. Finally. YAY!
...how many times have I said that now?
It couldn't be done last week because the plumbers had trouble stabilizing our clawfoot tub's feet. Thus, we had a new primary mission: secure the feet by any means necessary!
These things have a dozen different ways they're supposed to attach depending on design, manufacturer, etc. but our's is a tongue and groove deal like this:

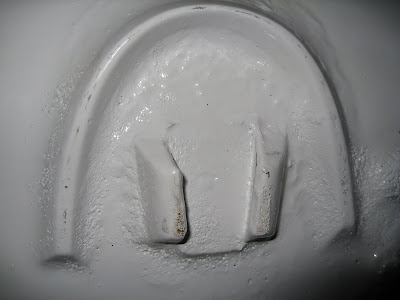
I put that hole in the tongue.
Since they slide in from the front, the weight of the tub tends to push them right back out. We tapped them in with a rubber mallet as far as they'd go, but the fit is just not tight enough. Plus the powder coating makes the surfaces rather slick.
People told us that we basically needed a wedge, although given the spatial orientation of the problem, I had a hard time imagining how this would work. Apparently, they used to use old-school flat, square nails in these things. But we eventually found out that is for a different configuration of feet, where there's a groove running perpendicular to the tongue (there it's acting like a stop, not really a wedge).
So I drilled a hole in the "tongue" of each foot, inserted a bolt, and installed heavy duty turnbuckles connecting two eye bolts between the feet to hold the feet in tension and prevent lateral slippage.
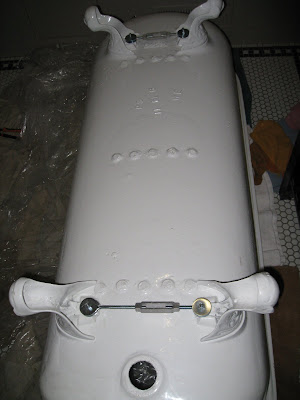
I'm not breaking new ground here, and this feels extremely sturdy (the tub is upright again). If the foot tongues don't break, I think we should be totally fine.
...and we should finally have a shower. TOMORROW.
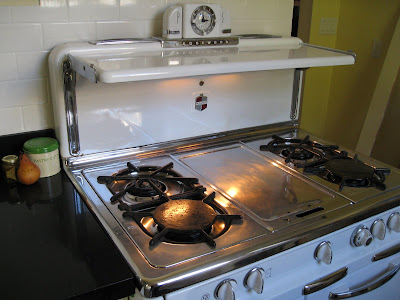
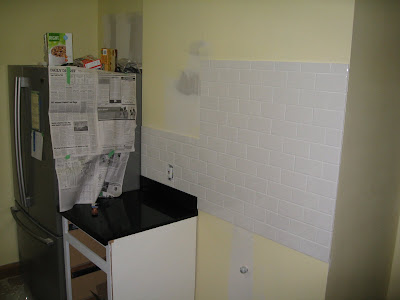
Kitchen is done ...ish
All the contractor work, that is. Today we had the subway tile backsplash finished, so, not counting them hauling up the stove from the garage and plugging it in, all their work is done in this room.


Reilly and I still have a lot of cabinet work to do. We have to finish the doors and drawer fronts, paint (they're only primed white at the moment), and re-mount. We need to do the same for the pantry, although that's a lower priority.
I have started on the drawers and doors. The tricky bit is that we're making them inset door faces where they had been overlay. So they all have to be cut 1/16" smaller than the door opening, and as true/plumb as possible. So far I've got just one simple drawer done, and I think it came out well:
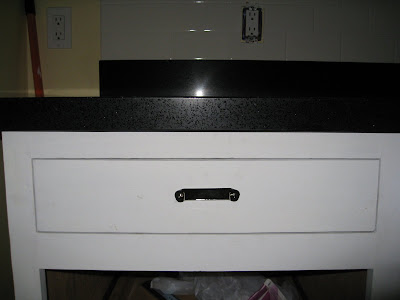
The overlay drawer faces were easily reused, since it only required the removal of material on all 4 sides. The old door faces have more complex joinery, so we need to make the new, shaker style doors from scratch. We'll accomplish that the same way we did the bathroom wainscoting -- simple strips of trim.
I'm especially stoked about the whiz-bang drawer slides I bought (am I a yuppie douchebag or what?!). Check it out:
Friday, January 9, 2009


DIY Concrete Vanity Top - Part V - The Final(?) Chapter
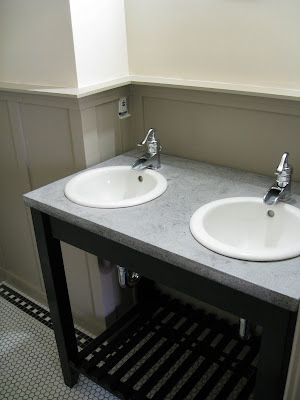
TA DAAA!
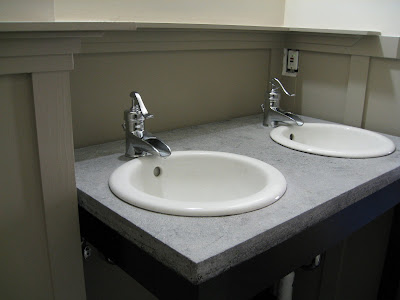
Not bad, eh? Not at all what I was aiming for, and yet, I think it looks pretty damn cool.
Sanding down the surface took the stain right off, except from the low spots and crags, which gave it a lot of dimension. I was a bit worried that without the stain it looked like a piece of sidewalk, and with it, it looked like a piece of asphalt. In the end, it's all good!
I think our vanity came out just like the farmhouse-industrial dohicky we wanted. :-)
Unfortunately, this does not mean the bathroom is done. The plumbers got a lot of work done, including putting in our new water heater and hooking up the faucets above (at least the sponge baths are warmer!). But the shower is a different story. We're having trouble keeping the clawfoot feet on the tub, and the engineering challenge is keeping us dirty.
The feet are tongue-and-groove (sort of), and it seems they keep wanting to slip out. Not good with a 400 pound iron tub. Plumbers won't be back until Tuesday, either. :-(

Not bad, eh? Not at all what I was aiming for, and yet, I think it looks pretty damn cool.
Sanding down the surface took the stain right off, except from the low spots and crags, which gave it a lot of dimension. I was a bit worried that without the stain it looked like a piece of sidewalk, and with it, it looked like a piece of asphalt. In the end, it's all good!
I think our vanity came out just like the farmhouse-industrial dohicky we wanted. :-)

Unfortunately, this does not mean the bathroom is done. The plumbers got a lot of work done, including putting in our new water heater and hooking up the faucets above (at least the sponge baths are warmer!). But the shower is a different story. We're having trouble keeping the clawfoot feet on the tub, and the engineering challenge is keeping us dirty.
The feet are tongue-and-groove (sort of), and it seems they keep wanting to slip out. Not good with a 400 pound iron tub. Plumbers won't be back until Tuesday, either. :-(
Sunday, January 4, 2009
End of "Vacation" Update
If the plumbers are working tomorrow, the bathroom should be ready for them. We've finished the wainscoting and painted. Check it:


The vanity top still isn't ready, though. The top is not nearly smooth enough, so I tried some 400 grit wet/dry sandpaper. It just took the stain right off and didn't really do much for the surface. It looks like I'm going to have to grind it a little, which isn't what I'd hoped but I'm sure it'll come out fine. The bathroom is looking good!


The vanity top still isn't ready, though. The top is not nearly smooth enough, so I tried some 400 grit wet/dry sandpaper. It just took the stain right off and didn't really do much for the surface. It looks like I'm going to have to grind it a little, which isn't what I'd hoped but I'm sure it'll come out fine. The bathroom is looking good!


Thursday, January 1, 2009
More Master Bath
No (professional) work going on this week, but Reilly and I have been busy. We're quickly putting up the wall treatment in the bathroom so that, when the plumber does come back, he can do our finish plumbing right away!
DIY wainscoting:

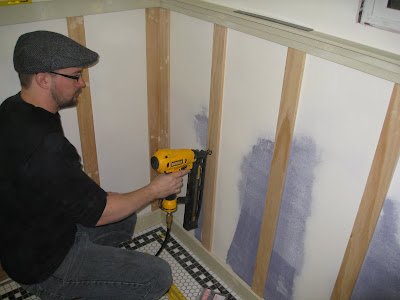
I love having a nail gun. :-)
This evening Reilly patched and sanded and prepped and primed the whole room (whew!), and we should be good to go to finish tomorrow.
Now just have to agree on color.......
DIY wainscoting:


I love having a nail gun. :-)
This evening Reilly patched and sanded and prepped and primed the whole room (whew!), and we should be good to go to finish tomorrow.
Now just have to agree on color.......
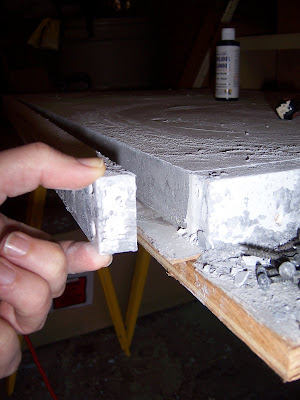
DIY Concrete Vanity Top - Part IV
The Big Reveal!

Ok, so clearly it cured pretty frackin' far from black. In order to get it closer to the intended color, I went in search of stain (small bottle on top). Then it was time to remove the mold...
Ooooohh....pitty pitty!
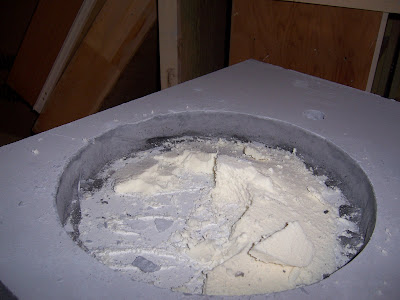
The sink knockouts came out pretty easily, but the PVC faucet holes are still in there. I think they're wide enough for the faucet bits, so I'll probably just leave them in.

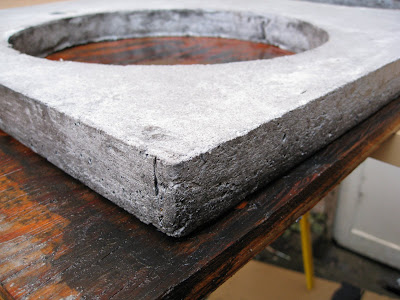
I think I worked the surface with the trowel too much. I wanted a pretty glassy and uniform top, and had not intended to grind or sand much, which makes the aggregate portion of the concrete (in this case, sand) more visible. I can tell the sand is going to make the surface somewhat speckled and sparkley, even with the black stain. The stain won't take to those tiny quartz and glass grains.
Hey, at least it's flat!


And here I am applying the stain. Depending on how it looks tomorrow, I may do one more coat, but no more. Then it will be buffed and beeswaxed...and installed!

Ok, so clearly it cured pretty frackin' far from black. In order to get it closer to the intended color, I went in search of stain (small bottle on top). Then it was time to remove the mold...

Ooooohh....pitty pitty!

The sink knockouts came out pretty easily, but the PVC faucet holes are still in there. I think they're wide enough for the faucet bits, so I'll probably just leave them in.


I think I worked the surface with the trowel too much. I wanted a pretty glassy and uniform top, and had not intended to grind or sand much, which makes the aggregate portion of the concrete (in this case, sand) more visible. I can tell the sand is going to make the surface somewhat speckled and sparkley, even with the black stain. The stain won't take to those tiny quartz and glass grains.
Hey, at least it's flat!


And here I am applying the stain. Depending on how it looks tomorrow, I may do one more coat, but no more. Then it will be buffed and beeswaxed...and installed!
Subscribe to:
Posts (Atom)
